
projects
Glass Stone Magnets & More

Here’s what you will need:
*clear glass stones with flat backs
Touché carries three sizes of stones, though the medium size is most often used for magnets.
Some stones may come with a film on them. This is easily removed by either rubbing or washing the stones.
*permanent stamp pads
Touché prefers Memories stamp pads because they are permanent, dry quickly, & the rainbow pads provide many colors ...perfect when working with small stamps. Most glues that are suitable for this project are water based and would cause inks to run, unless they are permanent.
*permanent markers
Touché recommends Fabrico markers
*glue--one that dries clear and will work with glass. We recommend Crafters Pick Ultimate Glue...it is a great glue with MANY uses. Diamond Glaze also works well.
*magnetic material
Touché recommends sticky back magnetic sheets for its ease & convenience
*cardstock
Either white or colored, depending on what you are making and your personal preference
1) Pick the stone you want to work with. Since these stones are made of glass, the size and shape can vary greatly. Some shapes/sizes may work best for the images and composition you are working with.
2)Stamp your image on cardstock. We used colored paper when stamping letters for picture frames. Otherwise, we used white cardstock so that color could be added as desired. Color images with markers. Add more color with sponges, etc.
3)There are two ways to cut out the card stock to fit the size of the stone. If you are working with an odd size or shape stone OR would like the paper to cover the entire back of the stone, apply glue to the flat part of the stone and then lay it on your stamped image. Pick it up and press the paper firmly into the glue, making sure the glue covers the entire flat surface of the stone. You should see the image(s) through the glass. This will dry clear. Don’t be afraid to move your paper around...you have used permanent inks, it will not smear! Let this dry 10-15 minutes, then trim around the stone using a scissors.
***To make this process go quicker and easier there is a punch that is the approximate size of most medium sized stones. The one we use is a thumb punch, manufactured by EK success, and it’s orange in color. When you are done stamping and coloring simply punch the image(s) out. You can slide the cardstock into the punch and turn it over so you can see the image and center it...punching out exactly what you want. Apply glue to the flat side of the stone, put your circle, image side down, into the glue. Turn over the stone and make sure the glue is covering the stone, pressing the cardstock to the stone.
4)The sticky back sheets of magnet can be punched using the same punch described above. This will work with whatever method you have used for gluing, unless you prefer the back side of the stone completely covered with magnetic material...then glue as you did the cardstock. Peel the paper off of the magnet and attach it to the cardstock! You have a handmade magnet!
***This process works with photos as well, but, allow DAYS for the glue to dry...it WILL eventually dry and the photo will remain intact.
***You can also use this same process with small stones. Stamp out letters to spell sentimental words that can be glued on picture frames....such as MEMORIES, FAMILY, FRIENDS, etc. The small stones will also accommodate thumb tacks. Make up several, stick them into some thick cork that has been stamped and you have a truly personalized gift!
***All three sizes of stones can be made into magnets. The two larger sizes can be made into pins---just glue a pin back rather than a magnet to the flat side of the stone. The ideas are endless!
Create a Book


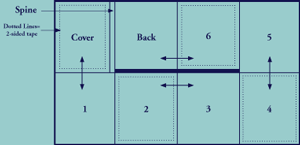
1) Stamping, scrapbooking &/or embellishing can be done on the outside of all panels—the side with the scored indents before or after the book is completed. CAUTION: If embellishing before the book is made do pages 5, 6 back & cover upside down. For an added “book-look”, see number 7.
2) TO AID IN FOLDING – Bend both ways on all scores including the gusset or spine of the book.
3) With outside (decorated/stamped side) facing up, fold in half lengthwise, so the unstamped side is on the inside.
4) While holding onto each side with both hands, the cover & page 1 should be in your left hand and pages 5 & 4 in your right hand. Push these pages toward the middle. Top view should look like this. The “connected” section should be on the bottom.
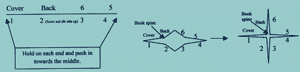
5) Push the cover & page 1 counter-clockwise and the back & page 6 clockwise, to form a book.
6) Attach the pages (cover & page 1, 2 & 3, 4 & 5, 6 & back) together using 2-sided tape along the edges or inside (UNSTAMPED SIDE). Apply 2-sided tape to the cover, page 2, page 4, & page 6 (every other page). The large diagram at the top illustrates which pages get attached to one another. The dotted lines indicate where 2 sided tape should be applied. DO NOT apply any tape until you have folded it up correctly at least once so you know that you are folding it correctly before anything gets stuck together !!! Some people have found it easier to lay the book flat & apply the tape & then fold it up--others have found it easier to fold the book up & then tape the inside of the pages together.
7. For an added book-look - cut 2 pieces of chipboard to 1/8 inch bigger than the cover (or purchase this already cut). Cover these boards with a separate sheet of decorative or handmade/hand stamped paper. Cut 2 pieces of paper 6” X 7 1⁄2”. Cut another piece of matching paper 2” X 5 1⁄2”. Attach this to the spine of the book with 2-sided tape. Apply 2-sided tape to the chipboard & then center it on the decorative paper & cut off all four corners. Fold up the edges & then apply 2-sided tape to hold these down. This should be done to both pieces of chipboard. So that the book can be tied shut, attach a piece of ribbon or fun fur between the chipboard & the cover and back. Run a line of 2-sided tape across the middle of the front & back of the book & lay it on the tape, wrapping it around the covered spine. Run tape around the rest of the cover & attached your covered chipboard, lining it up with the spine. Do the same for the back of the book.
© 2019 Touche´ Rubber Stamps | 1.800.241.8497 | info@touchestamps.com | Fax 507.286.1428